


Die RGB-Matrix soll ein zufälliges Pixelmuster anzeigen.
So sieht es aus:
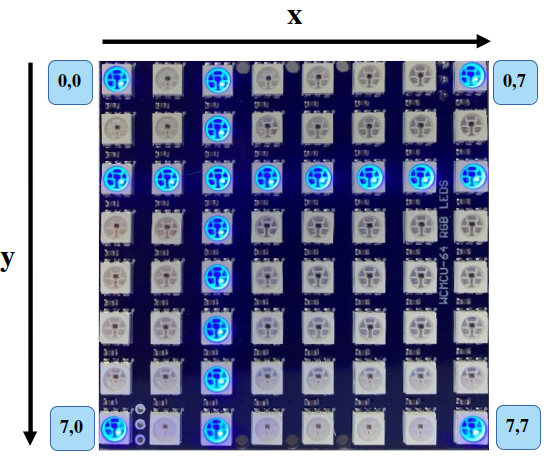
Die RGB-Matrix besteht aus miteinander verbundenen RGB-LEDs. Jede besitzt einen eigenen Controller und kann einzeln angesteuert werden. Die RGB-Matrix benötigt nur einen digitalen Eingang.
RGB ist eine Mischung aus den Farben rot, grün und blau. Die Werte werden durch Kommata getrennt.
Beispiele:


Hier findest du einen Überblick über die 🔗RGB-Farbcodes (externer Link abgerufen am 19.02.23).
Baue die Schaltung auf.
(Fahre mit der Maus über das Bild, um die Bezeichnungen der Bauteile zu sehen)
Benötigte Bibliotheken:
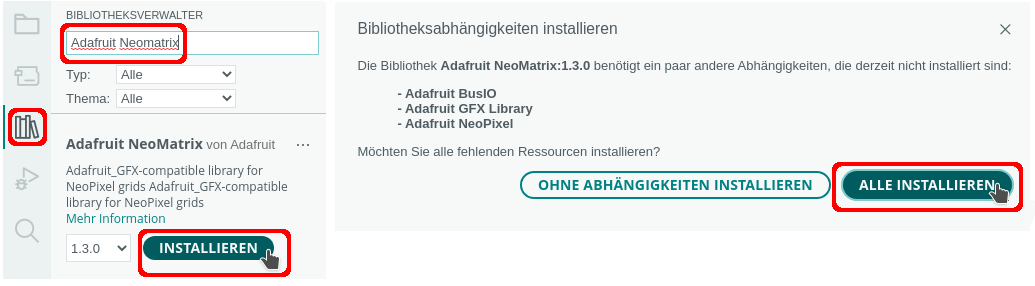
oder: Sketch -> Bibliothek einbinden -> Bibliotheken verwalten
Funktionen der Bibliothek Adafruit_NeoMatrix (Auswahl)
| Schlüsselwort | Parameter | Aktion |
|---|---|---|
| begin(); | RGB-Matrix starten | |
| setBrightness(Parameter) | 0 = aus, 255 = größte Helligkeit | Bildschirmhelligkeit setzen |
| setRotation(Richtung); | Richtung = 0 → nicht drehen Richtung = 1 → 90° drehen Richtung = 2 → 180° drehen Richtung = 3 → 270 ° drehen | Bildschirm ausrichten |
| fillScreen(Farbe); | Bildschirmhintergrund füllen Farben definieren: #define Rot RGBMatrix.Color(255,0,0) | Bildschirmhintergrund |
| drawLine(StartX, StartY, EndeX, EndeY, Farbe); | Linie zeichnen | |
| drawFastHLine(StartX, StartY, Länge, Farbe); | horizontale Linie zeichnen | |
| drawFastVLine(StartX, StartY, Länge, Farbe); | vertikale Linie zeichnen | |
| drawRect(StartX, StartY,, Breite, Höhe, Farbe); | Rechteck zeichnen | |
| drawRoundRect(StartX, StartY, Breite, Höhe, Eckenradius, Farbe); | abgerundetes Rechteck zeichnen | |
| fill.Rect(StartX, StartY, Breite, Höhe, Füllfarbe); | ausgefülltes Rechteck zeichnen | |
| drawCircle(MittelpunkX, MittelpunktY, Radius, Farbe); | Kreis zeichnen | |
| drawPixel(StartX, StartY, Farbe); | einzelnen Pixel zeichnen | |
| drawChar(StartX, StartY, Zeichen, Rot, Hintergrund, Textgröße); | drawChar(0, 1, 'Z', Rot, Weiss, 1); | Einzelnes Zeichen schreiben |
| fillCircle(MittelpunktX, MittelpunktY, Radius, Füllfarbe); | Ausgefüllten Kreis zeichnen | |
| setCursor(x, y); | Cursor setzen | |
| setTextSize(Textgröße); | Textgröße: 1 – 4 bei einer Matrix nur 1 möglich | Textgröße setzen |
| setTextColor(Farbe); | Textfarbe bestimmen | |
| print("Text"); | Text schreiben |
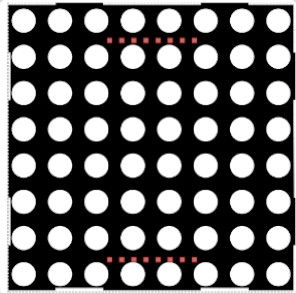
Ob die Ausrichtung der RGB-Matrix korrekt ist, kannst du mit diesem Programm feststellen:
|
1 2 3 4 5 6 7 8 9 10 11 12 13 14 15 16 17 18 19 20 21 22 23 24 25 26 27 28 29 30 31 32 33 34 35 36 37 38 39 40 41 42 43 44 45 46 |
#include "Adafruit_NeoMatrix.h" #define RGBMatrixPin 7 // RGBMatrix -> Name der RGB-Matrix /* die wichtigsten Parameter: Parameter 1 = Breite der Matrix (8) Parameter 2 = Höhe der Matrix (8) Parameter 3 = Name des Daten-Pins (RGBMatrixPin) */ Adafruit_NeoMatrix RGBMatrix = Adafruit_NeoMatrix(8, 8, RGBMatrixPin, NEO_MATRIX_TOP + NEO_MATRIX_RIGHT + NEO_MATRIX_COLUMNS + NEO_MATRIX_PROGRESSIVE, NEO_GRB + NEO_KHZ800); void setup() { RGBMatrix.setBrightness(10); // RGBMatrix starten RGBMatrix.begin(); } void loop() { RGBMatrix.clear(); // horizintale Linie RGBMatrix.drawFastHLine(0, 2, 8, RGBMatrix.Color(0, 0, 255)); // vertikale Linie RGBMatrix.drawFastVLine(2, 0, 8, RGBMatrix.Color(0, 0, 255)); /* leuchtende LEDs in den Ecken oben links oben rechts unten links unten rechts */ RGBMatrix.drawPixel(0, 0, RGBMatrix.Color(0, 0, 255)); RGBMatrix.drawPixel(7, 0, RGBMatrix.Color(0, 0, 255)); RGBMatrix.drawPixel(0, 7, RGBMatrix.Color(0, 0, 255)); RGBMatrix.drawPixel(7, 7, RGBMatrix.Color(0, 0, 255)); RGBMatrix.show(); } |
So muss es aussehen:

Ein Lauflicht:
Das dazugehörige Programm:
|
1 2 3 4 5 6 7 8 9 10 11 12 13 14 15 16 17 18 19 20 21 22 23 24 25 26 27 28 29 30 31 32 33 34 35 36 37 38 39 40 41 42 43 44 45 46 47 48 49 50 51 52 53 54 55 56 57 58 59 60 |
#include "Adafruit_NeoMatrix.h" // Startposition links oben int Spalte = 0; #define RGBMatrixPin 7 // RGBMatrix -> Name der RGB-Matrix /* die wichtigsten Parameter: Parameter 1 = Breite der Matrix (8) Parameter 2 = Höhe der Matrix (8) Parameter 3 = Name des Daten-Pins (RGBMatrixPin) */ Adafruit_NeoMatrix RGBMatrix = Adafruit_NeoMatrix(8, 8, RGBMatrixPin, NEO_MATRIX_TOP + NEO_MATRIX_RIGHT + NEO_MATRIX_COLUMNS + NEO_MATRIX_PROGRESSIVE, NEO_GRB + NEO_KHZ800); void setup() { // Helligkeit setzen RGBMatrix.setBrightness(10); // RGBMatrix starten RGBMatrix.begin(); } void loop() { RGBMatrix.clear(); // von oben nach unten for (int i = 0; i <= 7; i++) { RGBMatrix.drawPixel(Spalte, i, RGBMatrix.Color(0, 0, 255)); delay(100); RGBMatrix.show(); } RGBMatrix.clear(); // eine Spalte nach rechts Spalte++; // von unten nach oben for (int i = 7; i >= 0; i--) { RGBMatrix.drawPixel(Spalte, i, RGBMatrix.Color(0, 0, 255)); delay(100); RGBMatrix.show(); } // solange das Ende (Spalte = 7) nicht erreicht ist // -> eine Spalte hinzufügen if (Spalte < 6) Spalte++; // Ende erreicht, Spalte wieder auf 0 setzen else Spalte = 0; } |
Grafikfunktionen:
Das dazugehörige Programm:
|
1 2 3 4 5 6 7 8 9 10 11 12 13 14 15 16 17 18 19 20 21 22 23 24 25 26 27 28 29 30 31 32 33 34 35 36 37 38 39 40 41 42 43 44 45 46 47 48 49 50 51 52 53 54 55 56 57 58 59 60 61 62 63 64 65 66 67 68 69 70 71 72 73 74 75 76 77 78 79 80 81 82 83 84 85 86 87 88 89 90 91 92 93 94 95 96 97 98 99 100 101 102 103 104 105 106 107 108 109 110 111 112 113 114 115 116 117 118 119 120 121 122 123 124 125 126 127 128 129 130 131 132 133 134 135 |
#include "Adafruit_NeoMatrix.h" #define RGBMatrixPin 7 // RGBMatrix -> Name der RGB-Matrix /* die wichtigsten Parameter: Parameter 1 = Breite der Matrix (8) Parameter 2 = Höhe der Matrix (8) Parameter 3 = Name des Daten-Pins (RGBMatrixPin) */ Adafruit_NeoMatrix RGBMatrix = Adafruit_NeoMatrix(8, 8, RGBMatrixPin, NEO_MATRIX_TOP + NEO_MATRIX_RIGHT + NEO_MATRIX_COLUMNS + NEO_MATRIX_PROGRESSIVE, NEO_GRB + NEO_KHZ800); // Farben definieren #define Rot RGBMatrix.Color(255,0,0) #define Gruen RGBMatrix.Color(0,255,0) #define Blau RGBMatrix.Color(0,0,255) #define Magenta RGBMatrix.Color(139,0,139) #define Pink RGBMatrix.Color(255,20,147) #define Weiss RGBMatrix.Color(255,255,255) #define Gelb RGBMatrix.Color(255,255,0) #define ZufallsFarbe RGBMatrix.Color(random(1, 255), random(1, 255), random(1, 255)) void setup() { RGBMatrix.setBrightness(10); // RGBMatrix starten RGBMatrix.begin(); } void loop() { RGBMatrix.clear(); char Text[7] = {'A', 'r', 'd', 'u', 'i', 'n', 'o'}; for (int i = 0; i < sizeof(Text); i++) { RGBMatrix.drawChar(0, 1, Text[i], Rot, 1, 1); RGBMatrix.show(); delay(500); RGBMatrix.clear(); } delay(1000); RGBMatrix.clear(); // Matrix mit Farbe füllen RGBMatrix.fillScreen(Blau); RGBMatrix.show(); delay(500); RGBMatrix.clear(); RGBMatrix.fillScreen(Gelb); RGBMatrix.show(); delay(500); RGBMatrix.clear(); RGBMatrix.fillScreen(Rot); RGBMatrix.show(); delay(500); RGBMatrix.clear(); RGBMatrix.fillScreen(Gruen); RGBMatrix.show(); delay(500); RGBMatrix.clear(); RGBMatrix.fillScreen(Magenta); RGBMatrix.show(); delay(500); RGBMatrix.clear(); // einzelnes Zeichen schreiben RGBMatrix.setCursor(0, 1); RGBMatrix.setTextColor(Pink); RGBMatrix.setTextSize(1); RGBMatrix.print('Z'); RGBMatrix.show(); delay(500); RGBMatrix.clear(); // Linie zeichnen for (int i = 0; i <= 7; i++) { RGBMatrix.drawLine(i, 0, i, 8, Gelb); RGBMatrix.show(); delay(200); } delay(500); RGBMatrix.clear(); // horizontale Linie zeichnen for (int i = 1; i < 9; i++) { RGBMatrix.drawFastHLine(0, i , i, Gruen); RGBMatrix.show(); delay(200); } delay(500); RGBMatrix.clear(); // vertikale Linie zeichnen for (int i = 1; i < 9; i++) { RGBMatrix.drawFastVLine(i, 0 , i, Magenta); RGBMatrix.show(); delay(100); } delay(500); RGBMatrix.clear(); // Kreis zeichnen RGBMatrix.drawCircle(4, 4, 3, Weiss); RGBMatrix.show(); delay(500); RGBMatrix.clear(); // ausgefüllten Kreis zeichnen RGBMatrix.fillCircle(4, 4, 3, Blau); RGBMatrix.show(); delay(500); // Rechtecke zeichnen RGBMatrix.clear(); for (int i = 1; i < 9; i++) { RGBMatrix.drawRect(0, 0, i, i, RGBMatrix.Color(0, 255, 255)); RGBMatrix.show(); delay(200); } delay(500); RGBMatrix.clear(); } |
Das eigentliche Programm: LEDs mit Zufallsfarben:
|
1 2 3 4 5 6 7 8 9 10 11 12 13 14 15 16 17 18 19 20 21 22 23 24 25 26 27 28 29 30 31 32 33 34 35 36 37 38 39 40 41 42 43 44 45 46 47 48 49 50 51 52 |
#include "Adafruit_NeoMatrix.h" #define RGBMatrixPin 7 // Anzahl der leuchtenden LEDs // da die Position zufällig bestimmt wird, können sie sich auch überlagern #define AnzahlLED 64 // RGBMatrix -> Name der RGB-Matrix /* die wichtigsten Parameter: Parameter 1 = Breite der Matrix (8) Parameter 2 = Höhe der Matrix (8) Parameter 3 = Name des Daten-Pins (RGBMatrixPin) */ Adafruit_NeoMatrix RGBMatrix = Adafruit_NeoMatrix(8, 8, RGBMatrixPin, NEO_MATRIX_TOP + NEO_MATRIX_RIGHT + NEO_MATRIX_COLUMNS + NEO_MATRIX_PROGRESSIVE, NEO_GRB + NEO_KHZ800); #define Zufallsfarbe RGBMatrix.Color(random(1, 255), random(1, 255), random(1, 255)) void setup() { RGBMatrix.setBrightness(10); // NeoPixel Bibliothek initialisieren RGBMatrix.begin(); // Zufallsgenerator starten randomSeed(analogRead(A0)); } void loop() { RGBMatrix.clear(); int Minimum = 0; int Maximum = 8; for (int i = 0; i < AnzahlLED; i++) { // Zufallsposition der Pixel int Spalte = random(Minimum, Maximum); int Zeile = random(Minimum, Maximum); RGBMatrix.drawPixel(Spalte, Zeile, Zufallsfarbe); } RGBMatrix.show(); delay(1000); RGBMatrix.clear(); } |


Ähnliche Projekte
- Blinkende LED
- Blinkende LED mit einem Potentiometer
- Blinkende LEDs mit Multithreading
- Farbe und Helligkeit eines LED-Streifens mit Potentiometern manipulieren
- Farbenspiele mit einem LED-Streifen
- Farbenspiele mit einer RGB-LED
- Glücksrad mit NeoPixel-Ring
- Interrupt: Lauflicht mit Berührungssensor
- Interrupt – Lauflicht mit Drehgeber
- Interrupt: Licht ein- und ausschalten
Letzte Aktualisierung: